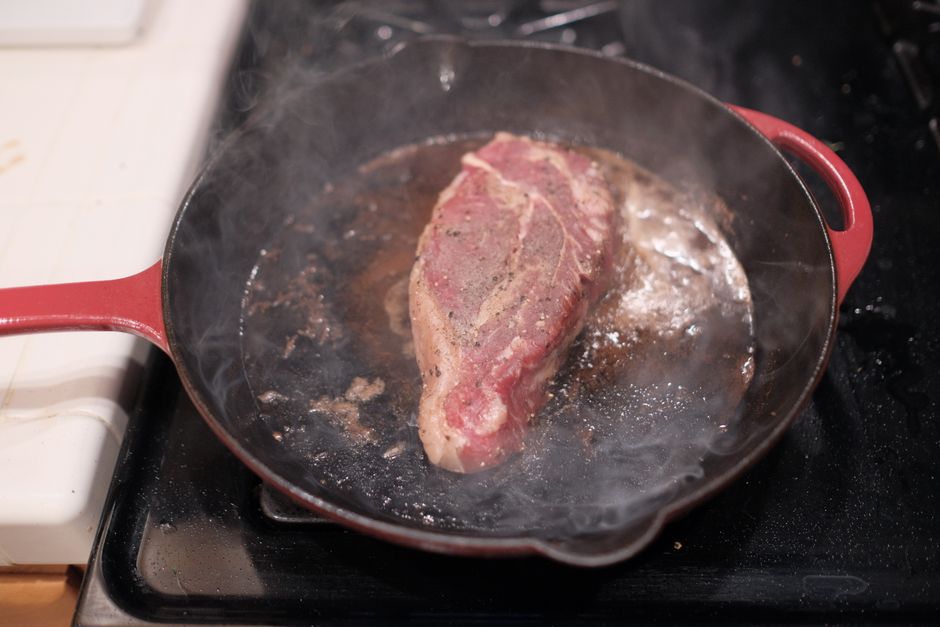
A 1¼-inch ribeye, a properly preheated cast-iron pan, and nine controlled minutes are what separate a leathery slab from a steakhouse-grade crust. Here is the exact sequence — salt window, pan temperature, flip cadence, pull temperature, and rest time — that keeps the juice inside the meat.
Dry-brine a 1–1½ inch steak with salt equal to about 1% of its weight for a minimum of 40 minutes (overnight is better), pat the surface bone-dry, then sear it in a cast-iron pan preheated to 400–450°F with a high-smoke-point oil — 2 minutes on the first side, 2 minutes on the second, then flip every 30–60 seconds until the center reads 120–125°F for medium-rare. Pull it 5°F before your target, rest it 5–8 minutes on a wire rack, and slice across the grain.
- Why Stove-Top Steak Turns Tough: Three Forces at Work
- Choosing a Cut That Can Actually Stay Juicy
- The Ten-Step Stove-Top Method
- Doneness, Pull Temperatures, and Timing
- The Thin-Steak Trap and Pan-Temperature Reality Check
- Two Chef Shortcuts: Baking Soda and the Dry Brine
- Equipment: What Actually Matters
- Troubleshooting: Six Things That Ruin a Stove-Top Steak
- Resting, Slicing, and Serving
- Frequently Asked Questions
Why Stove-Top Steak Turns Tough: Three Forces at Work
Toughness on the stove is rarely a seasoning problem. It is a moisture-loss problem, and it almost always traces back to one of three mechanical events inside the muscle.
1. Myofibril contraction squeezes water out
As steak passes roughly 140°F, the muscle proteins myosin and actin begin to denature and contract. That contraction physically wrings water out of the fibers. A steak cooked to medium-rare loses about 15–18% of its raw weight to drip and evaporation; pushed to well-done, that figure climbs past 25%. The meat you are left with is not dry because it lacks fat — it is dry because the fibers squeezed the water out and it ran onto the cutting board.
2. A cold center creates an overcooked band
Heat moves through beef slowly. A 1½-inch steak pulled straight from the refrigerator has a core near 38–40°F, and it takes far longer to reach 125°F than a steak that has been sitting out for 25 minutes. During that extra time, the outer ⅜ inch passes well beyond 160°F — gray, fibrous, and dry — while the center is still catching up. The result is a steak with a thin rosy middle and a thick chewy rim.
3. Surface moisture blocks browning
Maillard browning cannot begin until the steak’s surface temperature climbs above roughly 300°F and surface water has fully evaporated. Every drop of moisture on the exterior spends pan energy on steam instead. This is the entire reason a blotting step exists — not hygiene, but heat budget.
“A steak doesn’t get tough in the pan. It gets tough in the last thirty seconds you decide to leave it in the pan.”
— WorldDishly test-kitchen note, based on 40+ side-by-side sear trials
Choosing a Cut That Can Actually Stay Juicy
No technique rescues a cut that was never built for a fast, dry-heat sear. On the stove, you want muscles with fine fiber structure, decent intramuscular fat, and a uniform thickness of at least an inch.
| Cut | Ideal Thickness | Marbling | Stove-Top Behavior |
|---|---|---|---|
| Ribeye | 1¼–1½ in | High | The most forgiving stove-top steak. Heavy fat renders into the pan and self-bastes the crust. |
| New York Strip | 1–1¼ in | Medium-high | Firm chew, clean beef flavor. Trim the fat cap to ¼ inch so it renders in time. |
| Filet Mignon | 1½–2 in | Low | Extremely tender but dries fast; needs a butter baste and a precise pull temperature. |
| Top Sirloin | 1–1¼ in | Medium | Lean and firm. Benefits most from a 24-hour dry brine and against-the-grain slicing. |
| Flat Iron | 1–1¼ in | Medium-high | Best value on the board. Fine fibers, cooks in about 7 minutes total. |
| Hanger | 1 in | Medium | Intensely beefy, coarse grain. Slice thinly across the grain or it will chew like rope. |
| Skirt | ¾–1 in | Medium | Thin and fast — 90 seconds per side maximum, then rest and slice on a hard bias. |
| Chuck Eye | 1 in | Medium | Ribeye’s cheaper neighbor. Requires careful trimming of the gristle band. |
Beef grades are assigned primarily on intramuscular fat (marbling) and the age of the animal. Prime carries the most abundant marbling, Choice is moderate, and Select has the least[2]. For a stove-top sear, Prime and upper-Choice cuts buy you a wider margin of error, because rendered fat lubricates the muscle fibers as they contract.
The Ten-Step Stove-Top Method
This sequence is written for one 1¼-inch, 12–16 oz steak in a 10–12 inch cast-iron skillet. Double the pan size or cook in batches for two steaks — never crowd the surface, because a crowded pan drops below 300°F and the steak steams instead of searing.
For a 1¼-inch steak at medium-high heat, expect roughly 2 min + 2 min + 4–5 min of flipping = 8 to 9 minutes total pan time. A 1-inch steak runs 6–7 minutes. A 1½-inch steak runs 10–12 minutes. These are starting points — the thermometer, not the clock, is your decision-maker.
Doneness, Pull Temperatures, and Timing
Pull temperatures below target because carryover will finish the job. The right-hand columns assume a rested steak in a 400–450°F cast-iron pan with a 25-minute temper.
| Doneness | Pull At | After Resting | 1 in Thick | 1¼ in Thick | 1½ in Thick |
|---|---|---|---|---|---|
| Rare | 115–118°F | 120–125°F | 5–6 min | 7–8 min | 9–10 min |
| Medium-rare | 120–125°F | 128–133°F | 6–7 min | 8–9 min | 10–12 min |
| Medium | 130–135°F | 138–143°F | 7–8 min | 9–10 min | 12–13 min |
| Medium-well | 140–145°F | 148–153°F | 8–9 min | 10–11 min | 13–15 min |
| Well done | 150–155°F | 158–163°F | 10–11 min | 12–13 min | 15–17 min |
FSIS recommends cooking whole cuts of beef to a minimum internal temperature of 145°F followed by a 3-minute rest[1]. That corresponds to medium doneness. Steaks served below 145°F — including medium-rare — are a personal preference decision; whole muscle cuts carry a lower bacterial risk than ground beef because contamination stays on the surface, which the sear destroys. If you are cooking for anyone pregnant, immunocompromised, elderly, or a young child, cook to 145°F and rest 3 minutes.
The Thin-Steak Trap and Pan-Temperature Reality Check
Thin steaks — sandwich cutlets, thin-sliced sirloin, most grocery “minute steaks” — cannot be cooked to medium-rare with a good crust in a hot pan. The surface needs about 90 seconds at 400°F+ to brown, and by 3 minutes total the center has blown past 140°F. Your options: (a) accept 45–60 seconds per side and eat it rare-to-medium-rare with a light crust; (b) start it in a 200°F oven to 100°F, then sear 45 seconds per side; or (c) use it for a different dish entirely — these cuts shine in stir-fries and sandwiches, not on a dinner plate.
Oil temperature isn’t pan temperature
A pan can read 450°F on the iron surface and still drop to 280°F the moment a 40°F steak lands on it. The metal’s thermal mass is what recovers that drop, which is why thin stainless steel and nonstick pans fail here — they have almost no stored heat. Cast iron and heavy carbon steel carry enough mass to hold above 350°F through the first two minutes of contact, which is exactly the window where the crust forms.
Two Chef Shortcuts: Baking Soda and the Dry Brine
For a lean, firm cut like top sirloin or a cheaper select-grade steak, sprinkle ½ teaspoon of baking soda per pound over both sides, let it sit 15–20 minutes, then rinse thoroughly and pat dry before salting. Baking soda raises the surface pH, which limits how tightly the muscle proteins cross-link during heating — the fibers stay more open and hold more water[5]. Skip the rinse and you will taste soap. This is the same chemistry behind velveting in Chinese stir-fry technique, applied to a whole steak.
Fresh pineapple (bromelain), papaya (papain), kiwi (actinidin), ginger (zingibain), and figs (ficin) all digest protein — including the protein you are trying to eat. Kiwi is the most aggressive: 30 minutes of contact can turn the outer ⅛ inch of a steak into paste[4]. Pineapple and papaya will do the same over 1–2 hours. Canned pineapple is heat-treated and inert, so it is safe for long marinades. If you use a fresh enzymatic fruit, cap contact at 20–30 minutes and scrape it off before searing, or the surface will never form a proper crust.
Vinegar, wine, citrus, and buttermilk tenderize almost entirely at the surface. In 24 hours, acid penetrates only about 1–3 millimeters into a whole steak. What it can do is denature surface proteins so they hold water loosely, which reads as a juicier bite. Treat marinades as a flavor layer, not a tenderness solution — the tenderness comes from the cut, the salt, and the pull temperature.
Equipment: What Actually Matters
Three tools decide the outcome. Everything else is optional.
The rest of the kit
- Instant-read thermometer — the single highest-return purchase in home cooking. A steak cooked to 128°F versus 145°F is a completely different meal, and you cannot tell by touch.
- Infrared surface thermometer (optional but useful) — removes the guesswork from pan preheating.
- Wire rack + sheet pan — for the uncovered dry brine and for resting.
- Fish spatula — thin, flexible, and gets under the crust without tearing it.
- Paper towels — you will use more than you expect. Buy the sturdy kind.
Troubleshooting: Six Things That Ruin a Stove-Top Steak
Resting, Slicing, and Serving
The rest is not a pause — it is the final cooking stage. While the steak sits, the internal temperature continues climbing 5–10°F as heat migrates from the crust inward, and the contracted muscle fibers relax enough to reabsorb much of the liquid they released.
The rest, precisely
- 1 inch thick: 5 minutes
- 1¼ inches thick: 6–8 minutes
- 1½–2 inches thick: 8–10 minutes
Rest on a wire rack over a plate or sheet pan. Do not tent with foil for the first 2 minutes — the trapped steam softens the crust. After 2 minutes, a very loose foil tent over the top is fine if the room is cold.
Slicing against the grain
Find the direction the muscle fibers run — on a hanger or skirt steak, they are obvious parallel ridges. Turn your knife 90 degrees to those lines and cut ½-inch slices on a slight bias. Shortening the fiber length is the last mechanical tenderness lever you have, and on coarse-grained cuts it makes a bigger difference than any marinade.
Pour off all but 1 tablespoon of fat, set the pan over medium heat, and add ½ cup of stock or wine. Scrape the browned bits loose with a wooden spoon and reduce by half — about 3 minutes. Kill the heat, whisk in 1 tablespoon of cold butter, and season. The steak will be rested by the time the sauce is ready.
Storing leftovers
Refrigerate cooked steak within 2 hours in an airtight container for up to 3–4 days[6]. Reheat gently — a 250°F oven for 8–10 minutes, or a quick 30-second sear per side in a hot pan. The microwave will turn it gray and rubbery within 45 seconds. Cold leftover steak, sliced thin, is genuinely better in a sandwich than reheated whole.
Frequently Asked Questions
Should I really bring the steak to room temperature before cooking?
Partially. A 1-inch steak left out for 30 minutes will only rise about 5–10°F at the core — nowhere near room temperature. But that modest warming still narrows the gray, overcooked band around the edges, which is the real benefit. Leave it out 25–30 minutes, no longer. Beyond that, you are running food-safety risk for diminishing returns.
Does searing seal in the juices?
No. This is one of the most persistent myths in home cooking. The crust is porous and permeable — it adds flavor and texture, but it does not create a waterproof seal. In controlled tests, seared steaks actually lose marginally more moisture than unseared ones cooked to the same internal temperature[3]. Juice retention comes from not overcooking and from resting properly.
Can I make a tough cut like chuck roast tender on the stove?
Not with a fast sear. Chuck, brisket, and shank are full of collagen that needs sustained heat — 160°F and above for 2–4 hours in liquid — to dissolve into gelatin. A 10-minute stove-top sear on chuck roast produces something closer to shoe leather. Those cuts belong in a braise. For the stove, stick to ribeye, strip, filet, sirloin, flat iron, hanger, and skirt.
Why won’t my steak brown even in a hot pan?
Nine times out of ten it’s surface moisture. Meat straight from a vacuum-sealed package or a wet marinade carries a film of water that absorbs pan energy as latent heat until it evaporates. Blot thoroughly, then let the steak sit uncovered for 5 minutes so any residual surface dampness dries. The second most common cause is a crowded pan — two steaks in a 10-inch skillet drop the surface temperature below the 300°F Maillard threshold.
How do I keep butter from burning during the baste?
Add it late and keep it moving. Butter’s milk solids scorch around 300°F, well below a searing pan’s temperature. Introduce it in the final 45–60 seconds, tilt the pan toward you so the butter pools away from direct contact with the hot base, and spoon it over the steak continuously. If you want an earlier baste, clarify the butter first — clarified butter’s smoke point is roughly 450°F.
Can I use olive oil to sear steak?
Extra-virgin olive oil has a smoke point around 375–410°F depending on the oil and its free fatty acid content, which is right at the edge of where you want to be. It will work if you keep the pan at the lower end of the searing range, but it will smoke and turn bitter at 450°F. Refined olive oil (light olive oil) can handle more heat but has less flavor. Use avocado, rice bran, or grapeseed for the sear and add olive oil or butter at the end.
Is 145°F really required for beef safety?
The USDA’s FSIS recommendation for whole cuts of beef is 145°F followed by a 3-minute rest[1]. That is medium doneness, not medium-rare. Whole muscle cuts differ from ground beef because any bacterial contamination sits on the surface, where a hot sear destroys it. If you are cooking for a household member in a high-risk group, cook to 145°F. Otherwise, medium-rare at 130–135°F final temperature is a widely accepted personal preference.
How long can raw steak sit out before cooking?
Keep it under 2 hours total in the 40–140°F “danger zone,” including your tempering time[6]. A 30-minute temper is well inside that window. If you are cooking outdoors in warm weather, cut the temper to 15 minutes. Never leave a salted steak sitting on the counter overnight — that is what the refrigerator is for.
What if I don’t own a meat thermometer?
Use the touch test against the palm of your hand, but understand its limits. A relaxed open palm (below the thumb, no tension) roughly corresponds to rare; thumb-to-index finger to medium-rare; thumb-to-middle to medium; thumb-to-ring to medium-well; thumb-to-pinky to well done. The method is unreliable on steaks under an inch thick and on heavily marbled cuts. An instant-read thermometer costs less than two ribeyes — buy one.
- Salt at 1% of the steak’s weight at least 40 minutes ahead — 24 hours is better — on an uncovered wire rack in the fridge.
- Dry the surface completely before searing. Moisture is the single most common cause of a gray steak.
- Preheat cast iron for a full 5 minutes to 400–450°F, and use only high-smoke-point oil for the sear.
- Sear 2 minutes per side, then flip every 30–60 seconds to narrow the overcooked band around the edges.
- Pull at 120–125°F for medium-rare, rest 5–8 minutes on a rack, and slice against the grain.
- Enzymatic marinades like fresh kiwi or pineapple can destroy the surface in under 30 minutes — watch the clock.
- USDA Food Safety and Inspection Service — Safe Minimum Internal Temperatures / Safe Temperature Chart. Whole cuts of beef: 145°F with a 3-minute rest.
- USDA Agricultural Marketing Service — Beef Grades and Standards. Prime, Choice, and Select marbling criteria.
- López-Alt, J. Kenji — The Food Lab, Serious Eats. Testing on searing, frequent flipping, and dry-brining.
- Meat Science (Elsevier) — Research on plant protease tenderization, including bromelain, papain, and actinidin activity on muscle tissue.
- America’s Test Kitchen / Cook’s Illustrated — testing on baking-soda surface treatment and its effect on protein cross-linking and water retention in lean cuts.
- USDA FSIS — Leftovers and Food Safety. The 40–140°F danger zone, 2-hour rule, and cooked-beef storage limits.