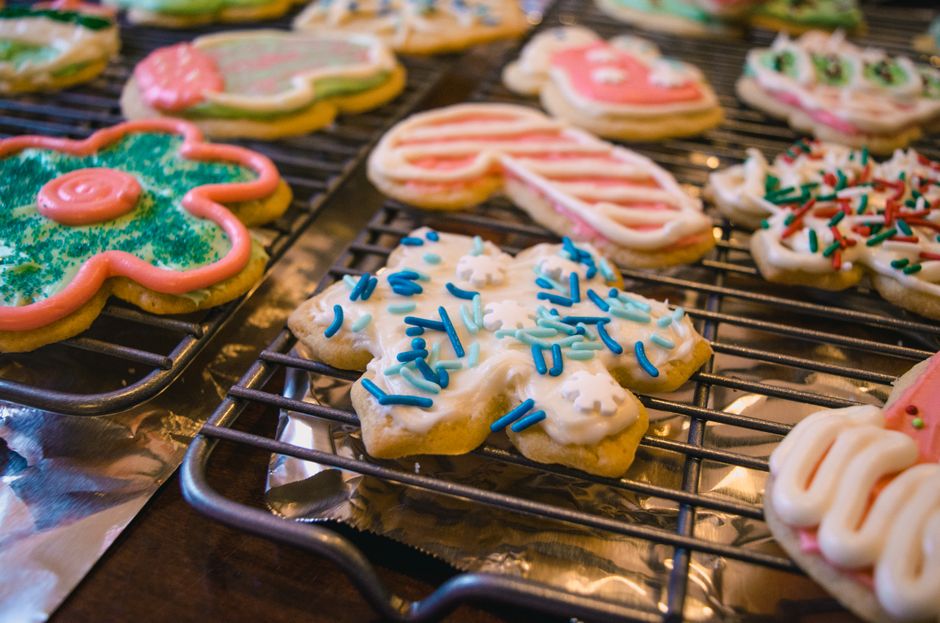
A weight-based sugar cookie recipe built on 227 g butter, a two-hour chill, and a 350°F oven — the dough that holds a razor-sharp cutter edge and still tastes like vanilla and browned butter instead of sweet cardboard.
Beat 227 g (1 cup) unsalted butter at 65–68°F with 200 g (1 cup) granulated sugar for a full 3 minutes. Add 1 large egg (50 g) and 8 g (2 tsp) vanilla extract, beating only 30–45 seconds. Mix in 300 g (2½ cups) all-purpose flour, 4 g (1 tsp) baking powder, and 3 g (½ tsp) fine salt on low until just combined. Chill the dough 2 hours minimum (overnight is better), roll to ¼ inch (6 mm), cut, and bake at 350°F (175°C) for 9–11 minutes. Cool 5 minutes on the pan before moving to a rack.
Flavor Profile & Where Sugar Cookies Came From
A properly made cut-out sugar cookie is not a blank canvas. It is a butter cookie with a specific architecture: a crisp, faintly caramelized rim that snaps, a tender interior with a fine short crumb, and a vanilla backbone that survives under a layer of royal icing. The flavor is restrained on purpose — 82% butterfat, real vanilla, and a whisper of salt — because the whole point is that the cookie tastes good naked, before it is decorated.
The lineage runs through northern Europe. English “jumbals” — knotted, sugar-sweetened butter biscuits — appear in 17th-century manuscripts, and German and Dutch settlers brought molded and cut butter cookies to Pennsylvania in the 1700s. The Moravian community in Nazareth, Pennsylvania, is credited with the American “Nazareth Sugar Cookie,” a thin, crisp, butter-rich round that locals still bake in large batches. The Christmas cut-out tradition is a 19th-century American development, accelerated by the arrival of inexpensive metal cookie cutters and, later, by commercial refrigerated dough in the mid-20th century.
This recipe lands in the middle and lets you choose your ending. Bake at ¼ inch for 9 minutes and pull the tray when the centers still look pale — you get a soft, bendy cookie that firms up overnight. Push to 11–12 minutes until the edges are visibly golden, and the same dough bakes into a crisp, dunking-grade cookie that holds icing without cracking.
The difference is entirely water loss and sugar caramelization at the edge. Thin edges dehydrate first, which is why the rim always crisps before the center.
One more distinction worth clearing up: a cut-out sugar cookie (rolled, chilled, shaped) and a drop sugar cookie (scooped, soft, often made with oil or shortening) share a name but not a formula. This guide covers the cut-out version — the one that needs to hold a sharp silhouette.
Ingredient Selection: What Each Component Actually Does
Sugar cookies fail more often from ingredient temperature and measurement than from technique. Weigh everything. A “cup of flour” scooped from the bag can swing from 120 g to 155 g depending on how packed it is, and that 35 g difference is the gap between a tender cookie and a brick.
Butter — 227 g (2 sticks / 1 cup)
Use unsalted butter and control the salt yourself. American-style butter is roughly 80–81% butterfat with about 16–17% water[2]; European-style butters push 82–85% fat and less water, which yields slightly less spread and a denser, more flavorful crumb. Either works — but if you swap, expect a small texture shift.
Butter temperature is the single most important variable in this recipe. Target 65–68°F (18–20°C): cool to the touch, but it dents easily when pressed with a fingertip and doesn’t crack. Cold butter (below 60°F) won’t trap air when creamed. Softened butter (above 72°F) is already partway to melted, and it will not hold the air you beat into it — the cookies will slump in the oven.
Sugar — 200 g (1 cup granulated)
Granulated white sugar does double duty: it sweetens, and its sharp crystals create friction against the butter that helps build the air cells responsible for an even, tender crumb. Superfine or caster sugar dissolves faster and gives a slightly finer texture — a good upgrade, not a necessity. Brown sugar, with its molasses and moisture, produces a softer, chewier, more spread-prone cookie and should not be substituted gram-for-gram.
Flour — 300 g (2½ cups) all-purpose
All-purpose flour sits around 10–11.5% protein, which is the sweet spot: enough gluten for structure, not so much that the cookie turns tough[3]. Bleached all-purpose (often ~10% protein) gives a marginally more tender result than unbleached (~11.5%). Cake flour, at 7–9% protein, produces a delicate, almost melting cookie but a dough that’s noticeably harder to roll and transfer.
Egg — 1 large (50 g without shell)
The egg provides water (for steam and lift), protein (for structure), and lecithin (an emulsifier that keeps fat and liquid from separating). One egg for 300 g of flour is deliberate restraint — more egg means more water, more gluten development, and more spread.
Leavening & Salt — 4 g (1 tsp) baking powder, 3 g (½ tsp) fine salt
Baking powder lifts the dough during the first six minutes of baking, then the structure sets. Skip it and the cookies go flat and dense; double it and the tops crackle and dome. Fine sea salt or table salt dissolves evenly. If you use Diamond Crystal kosher salt, increase to about ¾ teaspoon because its crystals are far less dense than table salt.
Vanilla — 8 g (2 tsp) pure extract
Two teaspoons is a generous pour by cookie standards, and it’s intentional: sugar cookies have almost no competing flavor, so vanilla quality reads loud and clear. Imitation vanilla contains vanillin and will taste flat and slightly chemical here. Vanilla bean paste adds visible flecks and a rounder flavor if you want it.
When you beat butter and sugar, the crystals punch tiny holes in the fat while the mixer folds air into them. Harold McGee’s On Food and Cooking describes this as a network of air cells stabilized by fat crystals[5]. Those cells expand in the oven and set the final crumb. Cream for 3 minutes — long enough to build the network, short enough that the butter doesn’t warm past 70°F and collapse it.
Prep & Equipment Overview
Nothing here requires specialty gear, but two items — a digital scale and a stack of parchment — will change your results more than any mixer upgrade.
Before you start, take the butter out 45–60 minutes ahead in a kitchen that’s 68–72°F. If your kitchen runs cold, cut the butter into tablespoon-sized pieces to speed warming. If it runs hot, err on the cooler side and let the mixer’s friction do the rest.
The Step-by-Step Master Method
Dough temperature before it hits the oven. Aim for 60°F (15°C) or colder. Warm dough means the butter melts before the structure sets, and the cookies spread into rounded blobs. Check with an instant-read thermometer inserted into the center of a cut shape. If it reads above 65°F, 10 minutes in the freezer fixes it.
Day 1: make the dough, chill overnight. Day 2: roll, cut, and bake. Day 3: ice and let the icing dry 12–24 hours. This staggered approach is how professional bakers keep the edges sharp — the dough is never warmer than the fridge, and the cookies are never iced while warm.
Key Ratios, Temperatures & Bake Times
This formula holds at a butter-to-sugar-to-flour ratio of roughly 1 : 0.9 : 1.3 by weight. That’s a slightly leaner dough than a shortbread (which runs closer to 1 : 0.5 : 1.4) and a firmer one than a drop cookie. Scale it by multiplying every weight below by the same factor.
| Ingredient | Weight | Volume | Function |
|---|---|---|---|
| Unsalted butter, 65–68°F | 227 g | 1 cup (2 sticks) | Fat, flavor, aeration |
| Granulated sugar | 200 g | 1 cup | Sweetness, structure, spread |
| Large egg | 50 g | 1 egg | Structure, emulsification, moisture |
| Pure vanilla extract | 8 g | 2 tsp | Flavor |
| All-purpose flour | 300 g | 2½ cups (spooned) | Structure, crumb |
| Baking powder | 4 g | 1 tsp | Lift during first 6 min |
| Fine salt | 3 g | ½ tsp | Flavor balance |
Total dough weight is approximately 792 g, which yields 30–36 cookies with a 2½-inch cutter at ¼-inch thickness, or roughly 48 cookies with a 2-inch cutter.
Thickness, Bake Time & Outcome
| Thickness | Bake Time at 350°F (175°C) | Resulting Texture | Best For |
|---|---|---|---|
| 3/16 in (5 mm) | 7–8 min | Crisp, snappy, delicate | Sandwich cookies, icebox style |
| 1/4 in (6 mm) | 9–11 min | Tender center, crisp rim | Standard cut-outs, icing |
| 5/16 in (8 mm) | 11–13 min | Soft, slightly chewy | Thick iced cookies, decorating |
| 3/8 in (10 mm) | 13–15 min | Cakey, soft-baked | Kids’ batches, gift boxes |
Oven Temperature Adjustments
| Oven Setting | Effect on Spread | Adjustment for ¼-inch Cookies |
|---|---|---|
| 325°F (163°C) | Minimal spread, more tender | Add 2 minutes |
| 350°F (175°C) | Standard | 9–11 min |
| 375°F (190°C) | More spread, crisper edges | Subtract 2 minutes |
| Convection 325°F (163°C) | Even, slightly more lift | 8–10 min |
Common Mistakes & Troubleshooting
Almost every sugar cookie problem traces back to four variables: butter temperature, flour weight, chill time, and oven time. Here’s how the failures actually present, and what to change next time.
Flour is a raw agricultural product and can carry E. coli and Salmonella. The FDA explicitly advises against eating raw dough or batter — including “safe” dough made without eggs — because the flour itself is the risk[1]. Any dough containing egg should be refrigerated within 2 hours of mixing and never left on the counter overnight[4]. Bake the cookies. Lick the spoon at your own risk.
Icing, Pairing & Storage Notes
What to Put On Top
- Royal icing — pasteurized egg white or meringue powder, powdered sugar, and water. Dries hard and glossy, holds piping detail, and is the standard for decorated cut-outs. Flood consistency is roughly 15–20 seconds to settle a ribbon drawn across the surface.
- Buttercream — softer, richer, and better tasting, but it never fully hardens. Best for sandwich cookies and casual batches that will be eaten within two days.
- Sanding sugar or cinnamon sugar — press on before baking, not after, so the granules adhere. Turbinado adds a satisfying crunch against the tender crumb.
- Powdered sugar glaze — 120 g powdered sugar plus 15–20 g milk. Brushed or dipped, sets in about an hour.
- Dipping chocolate — temper or use compound coating; a half-dipped edge with flaky salt turns this into a genuinely adult cookie.
How to Store Them
| Format | Method | Duration |
|---|---|---|
| Baked, undecorated | Airtight container at room temp, parchment between layers | 5–7 days |
| Baked, royal-iced | Single layer, uncovered 12–24 hrs to dry, then airtight | 2–3 weeks |
| Baked, buttercream-iced | Refrigerated in a single layer | 3–4 days |
| Baked cookies, frozen | Double-wrapped, freezer-safe container | 2 months |
| Dough discs, frozen | Wrapped in plastic plus a zip bag | 3 months |
| Slice-and-bake log, frozen | Rolled in a 2-inch cylinder, wrapped tight | 3 months |
To thaw frozen dough, move it to the refrigerator overnight — not to the counter, where condensation will make the surface sticky and unrollable. Frozen baked cookies thaw at room temperature in about 20 minutes and lose almost nothing, especially the crisp-edged version.
Crisp sugar cookies soften if stored in the same airtight container as a slice of bread or a halved apple. The cookie absorbs moisture from the bread and the crumb relaxes overnight. Remove the bread after 24 hours or the cookies will go past soft into soggy.
“A sugar cookie is a test of restraint. Every extra gram of flour, every extra minute of mixing, every degree of warm butter shows up in the finished shape.”
— WorldDishly Test Kitchen
Sugar Cookie FAQ
Can I skip the refrigeration step?
You can, but you’ll get a different cookie. Unchilled dough spreads significantly more, loses its cutter definition, and bakes into a thinner, crisper round. If you’re truly out of time, spread the dough on a parchment-lined sheet in a thin layer and freeze it for 25–30 minutes — that firms the butter enough to roll and cut, though it won’t develop the flavor and hydration benefits of a proper chill.
Why did my cookies spread in the oven?
Four culprits, in order of likelihood: butter was warmer than 70°F when creamed; the dough wasn’t chilled long enough; the pan was warm from a previous batch; or the oven was running below 350°F, giving the butter time to melt before the structure set. Always bake on a cool pan — rotate between two pans rather than reloading the same hot one.
How do I get really sharp, defined edges?
Three things: cut from dough that is genuinely cold (60°F or below), press the cutter straight down without twisting, and chill the cut shapes on the pan for 10 minutes in the freezer before they go into the oven. If the dough starts to warm while you’re cutting, work in smaller batches and return the rest to the refrigerator.
Can I freeze the dough?
Yes, and it’s the smart way to bake. Wrap flattened discs in plastic wrap, then a zip-top bag, and freeze up to 3 months. Thaw overnight in the refrigerator before rolling. For slice-and-bake, roll the dough into a 2-inch log after mixing, chill until firm, wrap tightly, and freeze; slice straight from frozen and add 1–2 minutes to the bake time.
Can I use salted butter instead?
Yes, but reduce the added salt. Salted butter in the United States typically contains about ¼ teaspoon of salt per 113 g stick, so a full cup (227 g) adds roughly ½ teaspoon. Omit the ½ teaspoon of added fine salt if you swap in salted butter, or cut it to a scant ¼ teaspoon if you want a hint more seasoning.
What’s the best icing for these cookies?
Royal icing for anything that needs to stack, ship, or hold fine detail — it dries hard and matte-shiny. Buttercream for flavor, if the cookies will be eaten within a couple of days. For a simple weeknight batch, a powdered sugar glaze with a squeeze of lemon is faster and tastes better than either. Whichever you choose, the cookies must be completely cool before icing.
Can I make these gluten-free?
Yes, with a caveat. Use a 1:1 gluten-free all-purpose blend that contains xanthan gum, swap it gram-for-gram for the flour, and expect a slightly softer dough that benefits from an extra 30 minutes of chilling. Roll gently — gluten-free doughs tear more easily and don’t stretch back into place as well.
Why is my dough crumbly instead of smooth?
Either the flour was over-measured or the butter was too cold when it hit the bowl. If the dough looks dry but holds together when squeezed, add cold water 1 teaspoon at a time until it just comes together. If the butter was cold, knead the dough a few times on the counter with your hands to bring it to a uniform temperature before wrapping and chilling.
How long do decorated sugar cookies actually last?
Royal-iced cookies kept airtight at room temperature stay good for 2–3 weeks — the icing forms a moisture barrier that slows staling. Buttercream-iced cookies need refrigeration and are best within 3–4 days. If you’re shipping cookies, royal icing is the only practical choice; package them in a single layer with bubble wrap between rows.
- Weigh your ingredients. 300 g flour, 200 g sugar, 227 g butter, 50 g egg — no volume guesswork.
- Cream butter and sugar at 65–68°F for exactly 3 minutes. Warmer or longer means spread and lost definition.
- Chill the dough a minimum of 2 hours; overnight is noticeably better for flavor and rolling behavior.
- Roll to a uniform ¼ inch and bake at 350°F (175°C) for 9–11 minutes, rotating at 6 minutes.
- Freeze cut shapes for 10 minutes before baking if you want bakery-sharp edges.
- Never eat raw dough — flour itself carries E. coli risk, with or without eggs[1].
- U.S. Food and Drug Administration. “Raw Dough’s a Raw Deal and Could Make You Sick.” fda.gov
- U.S. Department of Agriculture, FoodData Central. “Butter, without salt” and “Butter, salted” nutrient and composition profiles. fdc.nal.usda.gov
- King Arthur Baking Company. “Flour Protein Levels and How They Affect Baking.” kingarthurbaking.com
- USDA Food Safety and Inspection Service. “Refrigeration and Food Safety.” fsis.usda.gov
- McGee, Harold. On Food and Cooking: The Science and Lore of the Kitchen. Scribner, revised edition, 2004 — chapters on fats, sugar, and the creaming method.