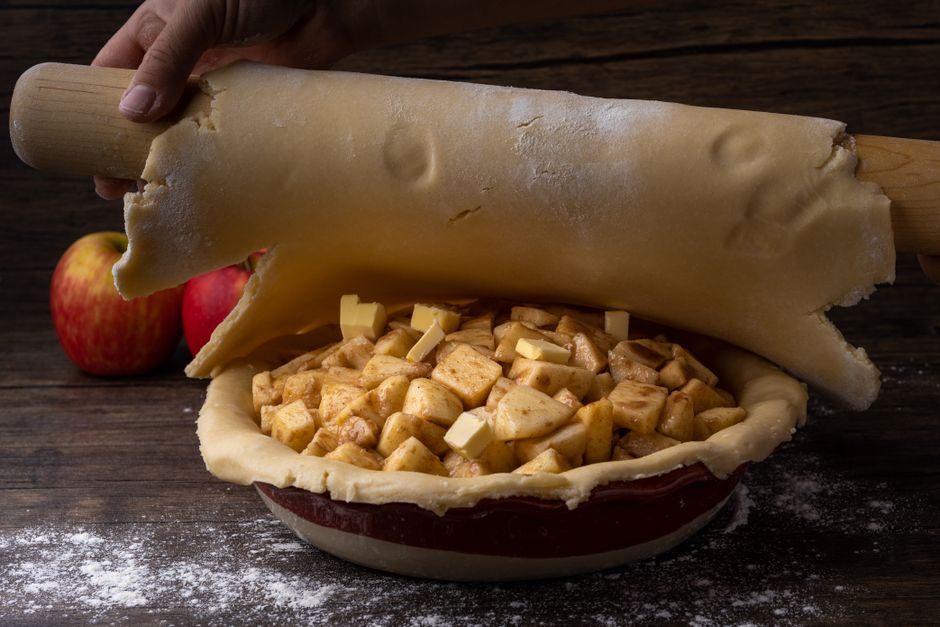
A double-crust apple pie engineered around two numbers that decide everything: 200°F for a filling that sets instead of runs, and a four-hour rest before the first slice.
Make an all-butter crust with 2½ cups (315 g) flour and 1 cup plus 2 tbsp (255 g) cold butter, hydrate it with ice water and cider vinegar, and chill it at least 2 hours. Macerate 3 lb (1.36 kg) sliced firm-tart apples with sugar and salt for 30 minutes, then drain and reduce the released juice to a syrup. Thicken with 3 tbsp tapioca starch, bake at 425°F (220°C) for 20 minutes then 375°F (190°C) for 40–50 minutes until the filling hits 200°F (93°C) at the center, and cool a full 4 hours before cutting.
Flavor Profile & the Real History of Apple Pie
A great apple pie tastes like three distinct things at once: browned butter and toasted flour in the crust, warm spice carried in fat from the filling, and sharp, clean fruit acidity cutting through both. The texture target is just as specific — a crust that shatters into distinct flakes rather than crumbling or bending, and a filling that holds its slice shape on the plate while still being soft enough to yield to a fork.
The dish most people picture as American actually has English bones. The earliest documented apple pie recipes appear in English manuscripts from the late 14th century, where the pastry was a sturdy, often inedible “coffin” container and the filling included figs, raisins, and saffron alongside apples. Sugar was scarce, so those pies leaned savory. When Dutch and English settlers brought the technique to North America in the 17th and 18th centuries, they met something they had never had in Europe: a continent of wild and, later, grafted apple varieties with genuinely varied acidity and aromatics.
European apples were largely cider and cooking varieties — intensely tart — which meant bakers had to add a lot of sugar, which meant a lot of liquid weeping out of the fruit during baking. That single variable is why historical apple pie recipes read like chemistry experiments, calling for breadcrumbs, crushed crackers, or “a spoonful of flour” to bind runaway juice.
Modern baking solved the same problem with better tools: controlled-starch thickeners like tapioca and cornstarch, apple varieties selected for firmness, and the maceration-and-reduce technique used in this recipe, which removes water before the pie ever reaches the oven.
Apples themselves trace back to the mountains of Central Asia — specifically the Tianshan range in what is now Kazakhstan — where Malus sieversii, the wild ancestor of every supermarket apple, still grows in forests with remarkable genetic diversity. The apple you bake with is a grafted clone, chosen by a nursery, not grown from seed. That matters for pie because the variety you buy is a fixed set of instructions about how much water, acid, and pectin that fruit will release at 200°F.
Choosing Apples: The Pectin-and-Acid Equation
Apple varieties behave differently in a pie for three measurable reasons: water content, titratable acidity, and pectin type and concentration. High-water apples (Red Delicious, Gala at peak ripeness, most McIntosh) collapse into sauce and flood the crust. High-acid apples (Granny Smith, Rhode Island Greening) hold their shape and taste bright but can read harsh alone. The practical move is a blend — roughly two-thirds firm-tart, one-third firm-sweet — so the filling tastes layered instead of one-note.
Granny Smith
Very high malic acid (roughly 0.8–1.0% titratable acidity), dense cell structure, high pectin. Holds distinct slices after 60 minutes at 375°F. Needs the full sugar quantity to balance.
Honeycrisp
Large, juice-filled cells that rupture explosively when bitten — a pleasure raw, a liability in pie. Use it as no more than one-third of the blend, and never as the only apple.
Best and worst varieties for baking
| Variety | Bake Behavior | Use It For |
|---|---|---|
| Granny Smith | Holds shape, very tart, high pectin | 50–65% of the blend |
| Braeburn | Firm, spicy, moderate acid | Excellent all-rounder |
| Golden Delicious | Softens more, aromatic, sweet | Up to 30%, adds floral notes |
| Jonagold | Balanced acid-sugar, decent structure | Blend partner |
| Honeycrisp | Very juicy, breaks down fast | Max 30%, never solo |
| McIntosh | Collapses to sauce | Applesauce, not pie |
| Red Delicious | Mealy, low acid, low flavor | Avoid entirely |
Peel everything. Apple skin contains additional pectin and tough cellulose that survives baking, giving the filling a slightly leathery texture in the mouth. The 20 minutes of peeling is not optional.
Apple cell walls are held together by pectin, a polysaccharide that begins to dissolve and de-esterify above roughly 185°F (85°C). The longer the filling sits above that threshold, the more structure it loses.[3] This is exactly why the bake is split: a short, violent 425°F blast sets the crust before the filling can fully liquefy, then a gentler 375°F phase brings the center to 200°F without turning the apples to paste.
Prep, Equipment & a 10-Minute Dough Check
Everything about pie crust comes down to one principle: fat must remain in solid, distinct pieces until the dough hits the oven. Those cold butter fragments are what create steam pockets that physically lift the dough into flakes. Warm butter smears into the flour and you get a tender but flat, cookie-like crust. So the entire crust workflow is an exercise in keeping things cold and handling them as little as possible.
Full ingredient list
Crust (double, 9-inch deep dish)
- 2½ cups (315 g) all-purpose flour
- 1 tbsp (12 g) granulated sugar
- 1 tsp (4 g) fine sea salt
- 1 cup (227 g) cold unsalted butter, cut into ½-inch cubes
- 2 tbsp (28 g) cold vegetable shortening or leaf lard, optional but improves flake
- ½ cup (120 ml) ice water, plus 1–2 tbsp as needed
- 1 tbsp (15 ml) apple cider vinegar
Filling
- 3 lb (1.36 kg) firm-tart apples — about 7–8 medium — peeled, cored, sliced ¼-inch thick
- ⅔ cup (133 g) granulated sugar, plus 1 tbsp if your blend skews tart
- 3 tbsp (24 g) quick-cooking tapioca starch or 3 tbsp (24 g) cornstarch
- 1 tsp (2.5 g) ground cinnamon
- ¼ tsp freshly grated nutmeg
- ¼ tsp fine sea salt
- 1 tbsp (15 ml) fresh lemon juice
- 2 tbsp (28 g) unsalted butter, cut into bits, for dotting
Finish: 1 egg beaten with 1 tbsp heavy cream, 1 tbsp demerara sugar.
After adding 6 tbsp of ice water, squeeze a handful of dough. If it holds together without crumbling and you can see butter streaks the size of flattened peas and a few almond-size slabs, stop. If it cracks apart, add ice water 1 tbsp at a time. If it feels tacky or greasy, you have overworked it — chill 20 minutes and proceed gently. Visible butter is the goal, not a homogenized dough.
The Master Method, Step by Step
Total time is about 7½ hours, but only 45 minutes of that is active work. The rest is chilling, macerating, baking, and the long rest that makes the difference between a slice that stands up and a slice that slumps.
“A pie is not finished when it leaves the oven. It is finished when it stops moving.”
— The single most common failure point in home apple pie
For a lattice top, cut the second disc into 10 strips about 1 inch wide using a pizza wheel. Weave over the filling, trim the ends, and press into the bottom crust rim. Lattice pies bake faster and lose more moisture — reduce the second-phase bake by 5 minutes and check the internal temperature at the 35-minute mark. Egg wash the lattice before baking; it is what gives the strips their lacquered snap.
Key Ratios & Temperature Benchmarks
These are the numbers worth writing on the inside of a cabinet door. They scale predictably, so a 10-inch pie needs roughly 25% more filling and a slightly longer bake, and a 9-inch standard (not deep-dish) plate needs about 20% less.
| Stage | Temperature | Time | What’s Happening |
|---|---|---|---|
| Butter/fat chilling | 38–40°F (3–4°C) | 15 min minimum | Fat stays solid and distinct; steam pockets form later |
| Dough rest | 38–40°F (3–4°C) | 2 hrs min, 24 hrs ideal | Gluten relaxes, water distributes evenly, shrinkage stops |
| Apple maceration | Room temp, 68–72°F | 30 min | Osmosis pulls ½–¾ cup water out of the fruit |
| Assembled pie freeze | 0°F (−18°C) | 20 min | Re-firms butter that softened during rolling |
| Crust-set phase | 425°F (220°C) | 20 min | Surface dries, crust structure locks in |
| Starch gelatinization | 144–180°F (62–82°C) | — | Cornstarch swells and thickens; tapioca begins at 140°F[2] |
| Pectin breakdown | Above 185°F (85°C) | Sustained | Cell walls soften; apples lose crunch but keep shape |
| Finish phase | 375°F (190°C) | 40–50 min | Maillard browning on crust, water evaporates |
| Filling doneness | 200°F (93°C) internal | Target | Thickener fully activated, pectin set |
| Cooling / set | Room temp | 4 hrs min | Gel network forms; filling stops flowing |
The three ratios that matter
- Fat to flour: roughly 0.8:1 by weight. For 315 g flour, use 255–275 g total fat. Below 0.7:1 and the crust is tough and lean; above 0.9:1 and it will not hold its shape when rolled.
- Thickener: 1 tbsp per pound of fruit. Three pounds of apples gets 3 tbsp tapioca or cornstarch. If you are using very juicy Honeycrisp or frozen apples, go to 3½ tbsp.
- Sugar: 20–25% of fruit weight. For 1,360 g of apples, 133–170 g of sugar. Stay at the low end if your blend includes Golden Delicious or Fuji.
Common Mistakes & Troubleshooting
Nearly every disappointing apple pie fails for one of seven reasons. Each has a specific fix, and most can be corrected in the same bake once you know what you are looking at.
Waiting less than 4 hours is not a stylistic preference. At 150°F the filling is still a liquid; at 100°F it has become a weak gel; below 80°F it holds a clean edge. If you must serve warm, reheat individual slices for 15 minutes at 300°F after the full cooling period — the gel will soften but will not dissolve.
Pairing, Serving Temperature & Storage
Apple pie has a natural acidity that makes it unusually flexible with pairings, but temperature controls the experience more than any topping. Served at 95–100°F, the filling smells more aromatic and tastes sweeter. Served at room temperature after a full rest, the texture is at its best. Ice cream on a freshly reheated slice creates a deliberate contrast between 95°F and 10°F, which is why the combination works.
Pairings that actually add something
- Aged sharp cheddar (12+ months). The classic New England pairing. The cheese’s tyrosine crystals and lactic acidity mirror the apple’s malic acid.
- Vanilla bean ice cream. Fat carries vanillin and the apple’s aromatic compounds simultaneously; a plain sweet cream base beats anything flavored.
- Crème fraîche. Higher fat, noticeable tang, no added sugar — the best choice if the pie itself is already sweet.
- Bourbon whipped cream. 1 tbsp bourbon per cup of cream. The barrel notes pick up the cinnamon and nutmeg.
- Espresso or black tea. Both have enough tannin to reset the palate between bites.
Storage rules
| State | Where | How Long | Notes |
|---|---|---|---|
| Baked, whole | Counter, loosely tented | Up to 2 days | Crust stays crisper uncovered than wrapped airtight |
| Baked, sliced | Refrigerator, covered | 3–4 days | USDA FoodKeeper guidance for baked fruit pie[1] |
| Baked | Freezer, double-wrapped | Up to 4 months | Thaw 6 hrs at room temp, reheat 350°F for 20 min |
| Unbaked, assembled | Freezer, firm-wrapped | Up to 3 months | Bake from frozen; add 15 min to the finish phase |
| Unbaked dough discs | Refrigerator | Up to 3 days | Freezer: 3 months, thaw overnight in fridge |
Never microwave a slice — the crust turns to leather in under 30 seconds. Reheat at 300°F (150°C) for 15 minutes on a sheet pan. The crust re-crisps as residual moisture escapes, and the filling warms to roughly 110°F, which is hot enough to melt ice cream without liquefying the gel.
Apple Pie FAQ
Can I use a store-bought refrigerated pie crust?
Yes, and it will work — with a caveat. Rolled refrigerated crusts are formulated with more shortening and less butter than a homemade all-butter version, so they bake up tender but noticeably less flaky, and they brown unevenly. If you go this route, thaw the crusts in the refrigerator for 45 minutes, not on the counter, and pre-bake the bottom shell for 12 minutes at 400°F with pie weights before filling. That single step prevents the soggy bottom that store-bought crusts are prone to.
How do I keep the bottom crust from getting soggy?
Five things, in order of impact: (1) macerate the apples with sugar and salt for 30 minutes and drain off the liquid; (2) reduce that liquid to a syrup instead of pouring it back in; (3) brush the bottom crust with beaten egg before filling; (4) bake on a preheated sheet pan at 425°F for the first 20 minutes; (5) use glass, ceramic, or dull aluminum — never a disposable foil pan.
Should I use tapioca starch, cornstarch, or flour to thicken?
Tapioca starch is the best default for fruit pies: it gelatinizes starting around 140°F, stays clear rather than cloudy, and does not mute the fruit’s aroma. Cornstarch needs a higher temperature range (roughly 144–180°F) and gives a slightly glossier, more opaque gel — excellent if you like a firm, clean-cut slice.[2] Flour is the weakest option, requiring nearly double the quantity and lending a raw, pasty flavor if the filling is underbaked. Use 3 tbsp tapioca or cornstarch per 3 lb of apples; if using flour, 5 tbsp minimum.
Why is my apple pie filling runny even after it cools?
Underbaking is the answer roughly 80% of the time. The starches in your thickener only build a permanent gel network if the filling is held above their gelatinization temperature long enough — and the center of a pie heats far more slowly than the edges. If the filling never reached 200°F, the gel will not hold. The other 20%: too much water in the fruit (no maceration), too little thickener for a juicy variety, or slicing the apples too thin so they release everything at once.
Can I make apple pie a day ahead?
Better than that — you should. Baked apple pie tastes best 12 to 24 hours after baking, once the spices have fully diffused into the filling and the crust has re-crisped. Store it loosely tented at room temperature overnight (not wrapped tight, which steams the crust), then refresh at 300°F for 12–15 minutes before serving. You can also assemble the whole pie, freeze it solid, wrap it airtight, and bake it from frozen within 3 months, adding 15 minutes to the 375°F phase.
Do I have to peel the apples?
For a classic apple pie, yes. Apple skin carries extra pectin and tough cellulose that survives a 60-minute bake, producing a slightly chewy, leathery texture against the soft filling. The one exception is a rustic galette, where thinly sliced, unpeeled apples can work if the fruit is very fresh and the bake is longer. In a double-crust pie, peel.
Can I use frozen apples?
Yes, but treat them differently. Frozen apple slices have already had their cell walls ruptured by ice crystals, so they release substantially more water and soften faster. Thaw them completely in a colander over a bowl, discard the liquid, and increase the thickener to 4 tbsp per 3 lb. Skip the 30-minute maceration — it has already effectively happened — and reduce the finish bake by 5 minutes since there is less water left to evaporate.
How long does homemade apple pie last?
At room temperature, 2 days — the crust is at its best on day one and day two. Beyond that, refrigerate it covered for up to 3–4 days, per USDA FoodKeeper guidance for baked fruit pies.[1] Refrigeration does soften the crust, so reheat slices at 300°F for 15 minutes to restore crispness. Frozen, a baked pie holds quality for about 4 months.
What is the ideal oven rack position?
Lower-middle. This puts the pie plate close enough to the bottom heating element to brown the base crust while still allowing the top to brown from ambient heat. Placing the pie on the lowest rack gives you a burnt bottom and a pale top; the upper-middle rack does the reverse. Always preheat the sheet pan with the oven so the crust gets direct conductive heat from below the moment it lands.
- Blend apples: roughly two-thirds firm-tart (Granny Smith, Braeburn) to one-third firm-sweet. Never use McIntosh or Red Delicious.
- Macerate sliced apples with sugar and salt for 30 minutes, drain, and reduce the released juice to a syrup before it goes back in the pie.
- Keep the crust cold at every stage — cold butter, ice water, chilled dough, and a 20-minute freeze on the assembled pie.
- Bake 425°F for 20 minutes, then 375°F for 40–50 minutes, and confirm the center of the filling reads 200°F.
- Cool a full 4 hours before the first slice. This is the step that separates a clean slice from a puddle.
- Store at room temperature up to 2 days, refrigerated 3–4 days, or frozen for 4 months — and always reheat at 300°F, never in a microwave.
- USDA Food Safety and Inspection Service, FoodKeeper App: Storage Times for Baked Fruit Pie. foodsafety.gov/keep-food-safe/foodkeeper-app
- Belitz, H.-D., Grosch, W., Schieberle, P., Food Chemistry, 4th ed. — Starch gelatinization temperature ranges for corn, tapioca, and wheat starches.
- McGee, H., On Food and Cooking: The Science and Lore of the Kitchen — Pectin degradation in fruit cell walls during thermal processing.
- USDA Agricultural Marketing Service, United States Standards for Grades of Butter — Compositional requirements (minimum 80% milkfat).
- USDA Agricultural Research Service, Apple Cultivar Composition Data — Titratable acidity, soluble solids, and firmness values by variety.
- Cornell University Cooperative Extension, Home Baking: The Art and Science of Pie Crust — Fat-to-flour ratios and gluten development in pastry.