Banana bread is not a recipe you rescue—it is a recipe that rescues overripe fruit. This guide explains the ingredient science, the exact mixing protocol, and the temperature cues that separate a tender, caramel-crusted loaf from a dense, gluey one, so the same formula works in any kitchen.
Use three very ripe bananas—about 360 g peeled—against a 240 g flour base. Mash them into a batter built with 113 g butter, 165 g brown sugar, and two eggs, then bake at 350°F (177°C) in a 9×5-inch pan until the center reaches 200°F–205°F (93°C–96°C). That internal-temperature window is the most reliable doneness signal in quick-bread baking.
- Banana Bread’s Secret History Is a Lesson in Flavor
- Choose the Banana First, Then Master the Supporting Cast
- The Simple Equipment Setup That Prevents Soggy Bread
- The Master Method: From Butter to Oven in Nine Steps
- Key Ratios and the Internal-Temperature Truth
- Where Banana Bread Goes Wrong—and the Fixes
- Storage, Toasting, and Make-Ahead Tactics
- Banana Bread Questions, Answered
Banana Bread’s Secret History Is a Lesson in Flavor
The loaf you pull from the oven today carries more than a century of frugal home baking inside its crumb. Banana bread entered the American baking lexicon in earnest during the 1930s, when baking soda and baking powder became pantry staples and home cooks suddenly realized that very ripe bananas could sweeten a quick bread without expensive sugar. It was a Depression-era kitchen logic that never left: do not waste food, and let the fruit do the work.
That history matters because it explains banana bread’s unusual structure. Unlike layer cakes, which rely on delicate air-cell aeration, banana bread is a “quick bread”—a category built on chemical leaveners rather than yeast. The bananas contribute moisture, sweetness, acidity, and natural fruit sugars that caramelize at the pan’s hot edges. Those browned edges deliver a faintly nutty, almost butterscotch note, while the interior stays velvety and just barely dense. A good slice should taste like the best parts of banana and brown butter in one.
The recipe works because each ingredient has a job: mashed fruit supplies moisture and flavor; fat coats the flour proteins to keep gluten strands short; sugar tenderizes and feeds browning; eggs emulsify and build structure; baking soda and baking powder provide lift. When you adjust one component—say, swapping in frozen bananas or doubling the butter—you are quietly changing all of those roles at once.
Choose the Banana First, Then Master the Supporting Cast
One ingredient decides whether banana bread tastes flat or perfumed: the banana itself. The ripening process is an ethylene-driven transformation, during which the fruit’s enzymes break down long starch chains into simple sugars and pectin softens the cell walls.[1] This is not a flavor metaphor; it is measurable chemistry. A yellow banana with just a few brown flecks is roughly at the beginning of that sugar conversion. A banana with a heavily speckled peel and a honeyed aroma is at the peak for baking.
What should you actually look for at the market or the fruit bowl? Choose bananas whose peels are covered in dark brown speckles or have turned entirely brown—the flesh should still smell sweet and fruity, never sour or boozy. If the fruit smells fermented, you have gone too far; those bananas taste flat and can make the loaf taste oddly vinous. Frozen bananas work beautifully, too. Freeze them in their peels, thaw overnight in the refrigerator, then drain off the excess liquid before mashing; thawed bananas actually mash more evenly because ice crystals puncture the cell walls.
Weigh peeled bananas after mashing. Three “large” bananas can vary from 280 g to nearly 420 g, and that 140 g swing changes the loaf’s moisture dramatically. For the master recipe below, aim for 360 g of peeled fruit—about three large or four medium bananas.
The supporting ingredients are straightforward, but each one changes texture in a particular way:
- All-purpose flour: Provides structure through gluten. A 240 g base (about 2 cups, spooned) gives the bread enough framework to rise without turning tough.
- Unsalted butter: Its fat coats gluten proteins, limiting their ability to form long, tough strands. Butter also brings the dairy-and-toast flavor that makes banana bread taste nostalgic.
- Brown sugar: Molasses in brown sugar adds gentle acidity for the baking soda and retains moisture, which keeps the crumb tender for days. Use light brown sugar for a mild caramel note or dark brown for a deeper molasses character.
- Eggs: Two large eggs supply proteins that coagulate during baking, helping the structure set around the pockets of banana moisture.
- Baking soda and baking powder: Baking soda reacts with acids in ripe bananas and brown sugar; a small amount of baking powder adds insurance lift in the middle of the loaf.
- Salt and cinnamon: Salt sharpens the banana flavor and balances sweetness; cinnamon is optional but plays beautifully against the fruit’s natural caramel notes.
The Simple Equipment Setup That Prevents Soggy Bread
You can bake banana bread with a fork, a mixing bowl, and a loaf pan. But a few intentional choices make the difference between a loaf that releases cleanly and one that sticks stubbornly to the pan. Use a metal 9×5×3-inch loaf pan if you have one. Dark nonstick pans absorb heat faster, which can over-brown the outside before the center finishes; if that is all you own, reduce the oven temperature to 325°F (163°C) and expect a slightly longer bake. Glass pans behave similarly, retaining heat and requiring closer attention to the crust.
Line the pan with a parchment sling. Cut one long strip of parchment the width of the pan and let it overhang the two long sides by about 2 inches. Grease the exposed ends lightly with butter or nonstick spray. The sling lets you lift the entire loaf straight out of the pan without flipping it onto a rack while it is still hot and fragile.
An instant-read thermometer is the one piece of equipment that removes all guesswork. Wooden skewers work, but they can give a false clean read when a piece of banana puree coats the tip. A thermometer reads the actual crumb temperature, which is a far more accurate indicator of doneness than a dry-looking crust.
Finally, set your oven rack in the middle position before preheating. If the loaf sits too close to the bottom element, the underside will darken and form a thick, tough crust; too high, and the top may dome and crack before the center sets. A moderate middle placement gives the loaf even heat from all sides.
The Master Method: From Butter to Oven in Nine Steps
Heat the oven to 350°F (177°C) before you do anything else. This master method yields a single 9×5-inch loaf, and the total active time is about 20 minutes. The baking time is where patience becomes part of the recipe.
Position the rack in the center of the oven. Fit a parchment sling into a greased 9×5-inch loaf pan. In a medium bowl, whisk 240 g all-purpose flour, 1 tsp baking soda, ½ tsp baking powder, ½ tsp fine sea salt, and ½ tsp cinnamon until uniformly pale; set aside.
Add 360 g peeled very ripe bananas to a large bowl and mash with a fork until mostly smooth. Leaving a few small ¼-inch chunks is ideal; they melt into pockets of concentrated flavor during baking.
In a separate large bowl, beat 113 g softened unsalted butter with 165 g packed light brown sugar for 2–3 minutes, until the mixture is light, fluffy, and no longer grainy. A hand mixer works, but a stiff spatula and elbow effort do too.
Beat in 2 large eggs, one at a time, waiting until the first is fully incorporated before adding the second. Mix in 1 tsp vanilla extract. If the batter looks slightly curdled at this stage, that is normal.
Fold the bananas into the butter-sugar mixture with a spatula. The batter will loosen and may look separated for a moment; keep folding gently until it comes back together into a thick, cohesive puree.
Sprinkle half the dry mixture over the batter and fold with 5–6 broad strokes. Add the remaining dry mixture and fold only until no streaks of flour remain. Stop immediately: overmixing develops gluten, producing a tough, tunneled crumb.
Scrape the batter into the prepared loaf pan and smooth the top with a spatula. If you like, sprinkle 1 tbsp turbinado sugar over the top for a crackly, glittering crust.
Bake for 50 minutes, then check the loaf. If the top is deeply browned but the center still wobbles, tent a sheet of foil loosely over the pan and continue baking. Total baking time is usually 55–70 minutes.
Insert an instant-read thermometer through the side of the loaf into the very center. Pull it when the temperature reads 200°F–205°F (93°C–96°C), the standard doneness target for tender quick breads.[3] Cool in the pan for 15 minutes, then lift out on the parchment and cool completely on a wire rack.
Quick-bread batter can sit for a few minutes, but it should not sit for an hour before baking. Once the liquid meets the dry ingredients, the leavening reaction starts. If you wait too long, the bubbles dissipate and the loaf emerges with a heavy, sunken middle. Have the pan ready before you mix the batter, and slide the loaf into the oven as soon as the flour is incorporated.
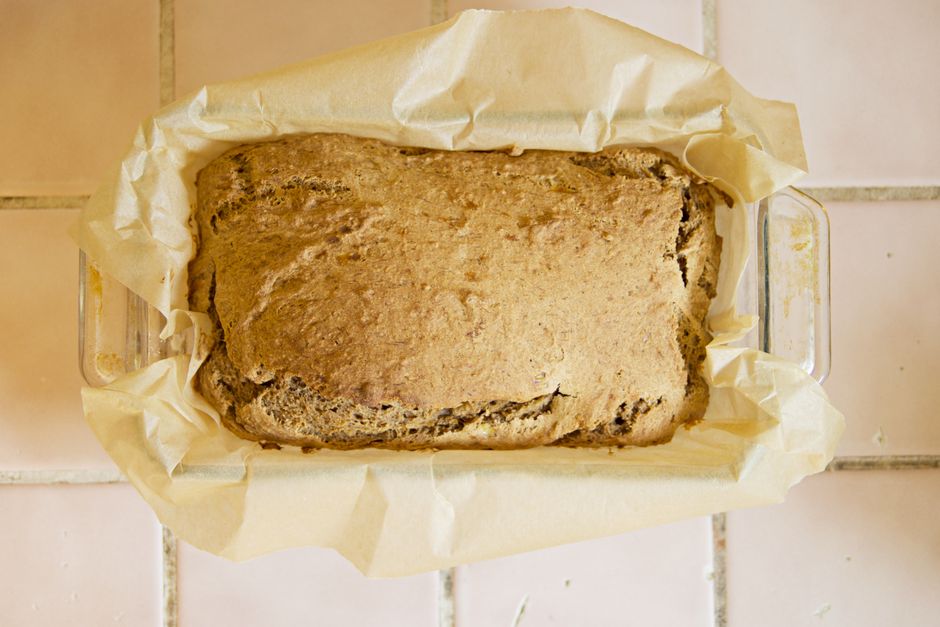
A properly baked banana bread has a deeply caramelized, domed top with a few natural cracks, a dark golden-brown crust, and an interior that springs back when pressed gently. Baked batter will pull slightly away from the sides of the pan—the surest visual sign that the structure has set.
Key Ratios and the Internal-Temperature Truth
Memorize the three-number ratio behind this recipe: 100% flour, 150% peeled banana, and roughly 70% brown sugar, all measured by weight. Once you internalize that framework, you can scale the loaf up, down, into muffins, or into a gluten-free blend without losing the essential character of banana bread.
| Ingredient | Weight vs. Flour | Amount for 9×5 Pan | Job in the Crumb |
|---|---|---|---|
| All-purpose flour | 100% | 240 g (about 2 cups) | Builds gluten structure |
| Peeled ripe bananas, mashed | 150% | 360 g (about 3 large) | Moisture, sweetness, acidity |
| Light brown sugar, packed | 69% | 165 g (about ¾ cup + 2 tbsp) | Sweetness, tenderness, browning |
| Unsalted butter, softened | 47% | 113 g (1 stick / ½ cup) | Tenderizes and adds dairy flavor |
| Large eggs | ~42% | 2 large (about 100 g) | Emulsification and structure |
| Baking soda | — | 5 g (1 tsp) | Primary chemical leavener |
| Baking powder | — | 2 g (½ tsp) | Insurance lift in the center |
| Fine sea salt | — | 3 g (½ tsp) | Sharpens flavor |
| Bake Parameter | Target | Why It Matters |
|---|---|---|
| Oven temperature | 350°F (177°C) | High enough to set the crust and trigger browning before the interior dries out |
| Pan size | 9×5×3 inches | Creates the ideal height-to-surface ratio for evenly cooked crumb |
| Center temperature | 200–205°F (93–96°C)[3] | The starch gels and proteins set in this range without the crumb turning dry |
| Resting time in pan | 15 minutes | Lets the crumb firm up enough to hold together when lifted out |
One important clarification: banana bread is safe to eat once it reaches around 165°F (74°C) from a food-safety standpoint, but it will still taste gummy at that temperature. The higher 200°F–205°F target is the textural goal. It ensures the starches have fully gelatinized, so the crumb sets into the characteristic moist-but-not-raw banana bread texture.
Where Banana Bread Goes Wrong—and the Fixes
Banana bread fails in a small number of predictable patterns. When you recognize the symptom, the remedy is usually simple: adjust moisture, mixing time, or oven position.
Storage, Toasting, and Make-Ahead Tactics
A banana bread’s flavor often peaks the day after baking, once the crust moisture has migrated into the crumb. Store an unfrosted loaf tightly wrapped in plastic wrap at room temperature for up to three days. Do not refrigerate an unfrosted loaf if you can avoid it: the cool air accelerates starch retrogradation, which makes the crumb taste stale more quickly.
For longer storage, freeze the loaf. Wrap the completely cooled bread tightly in plastic wrap, add a layer of foil, and freeze for up to three months. Freezing whole preserves the most moisture; pre-sliced freezing is more convenient if you plan to toast single slices. To thaw, leave the loaf at room temperature in its wrapping for several hours or overnight, then unwrap and warm slices in a 300°F (149°C) oven for 5–8 minutes to refresh the crust. Toasting is arguably the best way to eat leftover banana bread: the heat re-caramelizes the sugars on the cut surface and makes the interior taste almost newly baked.
If you add a cream cheese frosting or a fresh dairy glaze, the rules change. Once a dairy topping is applied, the loaf becomes a perishable item by food-safety standards; it should be refrigerated within two hours of being frosted and stored in the refrigerator afterward.[2] Let refrigerated slices come back to room temperature on the counter for about 20 minutes before serving so the crumb softens again.
Banana bread also makes a forgiving make-ahead baking project. The dry mixture can be whisked and stored in a sealed container up to three days in advance. The butter and eggs can sit at room temperature for 30 minutes before you start. Only the mashing and mixing should happen immediately before baking—once the batter is assembled, get it into the oven promptly for maximum lift.
Banana Bread Questions, Answered
Why is the middle of my banana bread always raw when the top is deeply brown?
Your oven temperature is likely running high, which browns the exterior before the center catches up. Confirm with an oven thermometer, and try baking at 325°F (163°C) with a longer time. Tenting the pan loosely with foil after 45–50 minutes also protects the top while the center finishes cooking.
Can I use frozen bananas straight from the freezer?
Thaw them first. Frozen bananas release a significant amount of water as the cell walls rupture; pour off the excess liquid before mashing. If you add that watery pool to the batter, you will need extra bake time and the crumb may turn gummy. After draining, thawed bananas often mash into an even smoother puree than fresh ripe ones.
Should I use baking soda or baking powder in banana bread?
Use both, in carefully measured amounts: 1 teaspoon baking soda for primary lift and ½ teaspoon baking powder as insurance. The soda reacts with the acids in ripe bananas and brown sugar, while the extra baking powder provides a second burst of carbon dioxide that helps the center rise evenly without a metallic aftertaste.
Can I replace the butter with oil or applesauce?
Neutral oil can replace butter at a rate of about ⅓ cup (80 ml) per 113 g stick of butter; the loaf will be slightly more tender but less flavorful. Applesauce replaces fat at about half the volume, but it also adds sugar and water, so reduce the sugar slightly and expect a more cakey, less caramelized loaf. For the classic nostalgic flavor, butter remains the strongest choice.
Why did my loaf crack down the center?
A dramatic center crack is not a failure; it is the signature of a properly risen quick bread. As the batter near the pan sides sets first, the still-rising center pushes upward and splits along the top. A few cracks give banana bread its rustic character, so embrace them.
Can I add chocolate chips or walnuts without ruining the texture?
Yes—up to 150 g of chips, nuts, or a combination works well in this batter. Toss the add-ins with 1 tablespoon of the measured flour before folding so they distribute evenly instead of sinking to the bottom. For walnuts, toast them first at 350°F for 6–8 minutes to deepen their flavor and keep them crunchy.
- Use bananas at the heavily speckled stage and weigh 360 g peeled for a 240 g flour base; ripeness is responsible for both sweetness and moisture.
- Follow the 100% flour / 150% banana / 70% sugar ratio to scale the loaf up, down, or into muffin tins confidently.
- Bake at 350°F (177°C) in a 9×5-inch metal pan with a parchment sling for even heat and clean release.
- Stop mixing the moment the flour disappears; overmixing develops gluten and creates a tough, tunneled crumb.
- Judge doneness by internal temperature, not a toothpick: pull the loaf at 200°F–205°F for a tender, fully set center.
- Store unfrosted banana bread at room temperature for up to three days or freeze for up to three months; refrigerate only if it carries a dairy frosting.
- Harold McGee, On Food and Cooking: The Science and Lore of the Kitchen, revised ed. (New York: Scribner, 2004) — fruit ripening, ethylene-driven starch-to-sugar conversion.
- United States Department of Agriculture Food Safety and Inspection Service (USDA FSIS), “Danger Zone” food-safety guidance — perishable items should not remain at room temperature longer than 2 hours.
- King Arthur Baking Company, quick-bread doneness standard — center internal temperature of 200°F–205°F (93°C–96°C).