A truly definitive chocolate chip cookie is more than a vehicle for chocolate — it is an engineered study in contrast: a crackly, caramelized sugar crust, a fudgy center that bends rather than crumbles, and molten shards of bittersweet chocolate streaked through every bite. This guide walks you through flour protein percentages, sugar ratios, dough-resting science, and the precise oven times that deliver a cookie worth bookmarking.
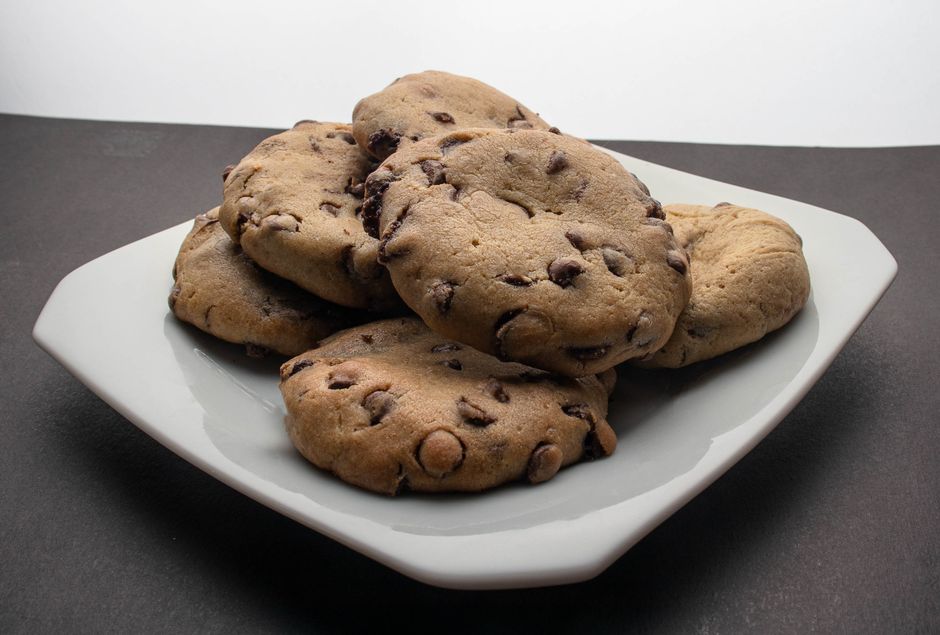
The best chocolate chip cookie starts with equal discipline and indulgence: weigh your flour and sugar, chill the complete dough for 12 to 72 hours, then bake 80-gram portions at 350°F (177°C) for 13 to 15 minutes until the edges are deep amber and the centers have lost their raw sheen but still look slightly underdone. Pull the tray, rest five minutes, and you get a crackly exterior with a fudgy, custard-like center.
- From One Historic Cookie to a Benchmark Flavor
- The Ingredient Lineup, Examined Ingredient by Ingredient
- The Master Chocolate Chip Cookie Recipe
- Step-by-Step Master Method: Cream, Fold, Chill, Bake
- Baker’s Ratios and Oven Temperature Cheat Sheet
- Why Your Cookies Miss the Mark — and How to Fix It
- Pairing and Storage: Keeping the First-Bite Magic Alive
- Chocolate Chip Cookie FAQ
From One Historic Cookie to a Benchmark Flavor
Ruth Wakefield baked the first recognizable chocolate chip cookie in 1938 at the Toll House Inn in Whitman, Massachusetts. She was adapting a butterscotch cookie recipe and chopped a semi-sweet chocolate bar into the dough, expecting it to melt into a uniform chocolate swirl. The chocolate held its shape in islands of sweetness, and the “Toll House Crunch Cookie” quickly became one of the most reprinted recipes in American culinary history.
What made that early formula so compelling is still the benchmark today: a buttery, slightly caramel-flavored dough supporting pockets of bittersweet chocolate rather than a one-note sugar bomb. The ideal chip cookie should taste first of browned butter and vanilla, then a gentle salt pull, and finally the chocolate — which should be dark enough to balance rather than merely sweeten. Texturally, the edges should shatter with a delicate crispness while the center stays soft enough to tear apart in a ribbon of steam.
The science behind that signature contrast is what separates an average cookie from a bakery-level one. A great recipe relies on moderately high sugar, precisely controlled gluten development, a rested dough, and a hot oven that browns the exterior before the interior fully sets. Once you understand the function of each ingredient, the technique becomes less about luck and more about predictable, repeatable chemistry.
The Ingredient Lineup, Examined Ingredient by Ingredient
Every chocolate chip cookie is a matrix of fat, starch, sugar, water, and air — and the ratio among those five components decides whether your cookie turns out thin and lacquer-crisp or thick with a center that barely holds its shape. Each ingredient below plays a specific structural and flavor role.
Butter: The Flavor and Spread Regulator
Standard American stick butter contains about 80 percent milk fat and roughly 15 to 16 percent water by law. The water content matters because it converts to steam in the oven, encouraging spread and lift. European-style butters with 82 to 84 percent fat produce less steam, a more tender crumb, and slightly richer flavor. For chocolate chip cookies, both work well; choose a high-quality unsalted butter and, if you can, use a European-style brand for the deepest dairy note.
Two Sugars Doing Different Jobs
White granulated sugar is hygroscopic in a limited way — it pulls water into itself and caramelizes at high heat, producing a crisp, golden surface. Brown sugar contains molasses, which is both acidic and highly hygroscopic; it draws and holds moisture from the environment, keeping the interior chewy long after the cookie cools. The acid in molasses also reacts with baking soda to produce carbon dioxide. For a cookie that is crisp at the rim and tender in the middle, you want both sugars in roughly similar proportions.
Flour: Structure, Not Starchiness
All-purpose flour typically contains 10 to 12 percent protein, which is enough to give cookie dough structure without turning it into bread. Higher-protein flour makes a chewier, slightly cakier cookie; lower-protein pastry flour produces a very tender cookie that may spread excessively. Bleached all-purpose flour, with its slightly altered starch and protein behavior, tends to produce a slightly thicker, paler cookie, while unbleached flour yields a slightly wider spread and deeper golden hue. Weigh your flour rather than scooping it: a gently scooped cup can range from 110 to 150 grams, which alone can ruin your ratio.
Eggs and Egg Yolks
A whole egg provides moisture and structure through its albumen and lecithin-rich yolk, which helps emulsify the butter and sugar into a stable cream. Adding one extra egg yolk creates a more tender, chewier crumb without adding significant water or albumen. Room-temperature eggs emulsify more readily into room-temperature butter, so pull yours out of the refrigerator 30 minutes before mixing.
Chocolate: Chips vs. Chopped Bars
Commercial chocolate chips are formulated with extra cocoa butter stabilizers so they hold their shape through baking — a useful property for visual appeal but not ideal for maximum chocolate flavor. Chopped 60 to 70 percent cacao chocolate bars contain more irregular fragments and fewer stabilizers, yielding both larger molten pools and tiny chocolate dust throughout the dough. For a balanced cookie, use a mixture: roughly 70 percent chopped bar and 30 percent nostalgic chips, or simply one excellent chopped 64 percent bar.
A cookie’s sweetness should come primarily from the dough; the chocolate should be bitter enough to offset it. If your recipe uses milk chocolate, reduce the dough sugar by roughly 10 to 15 percent. If you use a 70 percent bar, your current sugar level will likely taste more balanced.
The Master Chocolate Chip Cookie Recipe
This is the formula our test kitchen returns to again and again: crisp caramelized edges, a soft fudgy middle, and a deep butterscotch flavor that comes from the high ratio of brown sugar and the long chilled dough rest. If you have a digital kitchen scale, use the gram weights — volume measurements are included as backup, but baking is much more repeatable when every ingredient is weighed.
Yield: 20 cookies, each about 80 g (roughly 3 oz) before baking
- 2½ cups (300 g) unbleached all-purpose flour
- 1 tsp baking soda (about 4 to 5 g)
- ¾ tsp fine sea salt (use ½ tsp if using table salt)
- 1 cup (2 sticks / 226 g) unsalted butter, softened but still cool — about 65°F (18°C)
- 1 cup packed (200 g) light brown sugar
- ¾ cup (150 g) granulated sugar
- 1 large egg + 1 large egg yolk, room temperature
- 2 tsp vanilla extract
- 10 oz (285 g) bittersweet chocolate (60 to 70% cacao), roughly chopped; reserve about 20% for topping the dough balls
- Flaky sea salt for finishing, optional but recommended
For the absolute best texture, prepare the dough the day before you bake. A 12 to 72 hour period in the refrigerator does not merely chill the cookie — it hydrates the flour fully, concentrates the vanilla and molasses flavor, and firms the butter enough that the cookies spread slowly and develop more height. If you cannot wait, a 2-hour chill still improves the result meaningfully over baking immediately.
Step-by-Step Master Method: Cream, Fold, Chill, Bake
These steps are sequenced to control gluten development and dough temperature. Follow them in order, and you will produce consistent cookies every time, regardless of your oven’s quirks.
A correctly baked 80 g chocolate chip cookie should look slightly underdone in its center when it leaves the oven: the interior craters and cracks, but the dough beneath the cracks has lost its raw, glossy wetness. After 5 minutes on the sheet, the center will firm to a soft, fudge-like consistency. If the whole cookie looks uniformly set at the moment you pull it, it is almost certainly overbaked once cooled.
Baker’s Ratios and Oven Temperature Cheat Sheet
Understanding the ratio of ingredients opens the door to customizing texture with confidence. The recipe above, scaled against 300 g of flour, breaks down like this:
| Ingredient | Weight in Master Recipe | Baker’s Percentage (relative to flour) | Structural Role |
|---|---|---|---|
| All-purpose flour | 300 g | 100% | Protein network and starch structure |
| Unsalted butter | 226 g | 75% | Fat for tenderness, moisture for spread |
| Light brown sugar | 200 g | 67% | Moisture retention and caramelized flavor |
| Granulated sugar | 150 g | 50% | Crispness in the exterior crumb |
| Egg + egg yolk | about 70 g | 23% | Structure, emulsification, chewiness |
| Baking soda | 4 to 5 g | 1.5% | Alkalinity for browning and spread |
| Chopped chocolate | 285 g | 95% | Flavor contrast and molten texture |
For texture tuning, the most important levers are oven temperature and dough temperature. A 325°F (163°C) oven spreads the dough more gently, giving the center time to rise before browning, which can be useful for very thick, cakey cookies. A 375°F (191°C) oven sets the edges faster, creating a thinner, crisper cookie with more caramelized surface. The 350°F sweet spot in this recipe balances both outcomes.
| Target Texture | Oven Temp | Approx. Bake Time for 80 g Cookies | What Changes |
|---|---|---|---|
| Crisp all the way through | 375°F / 191°C | 11 to 13 minutes | Faster set, thinner spread, deeper browning |
| Chewy edge + fudgy center | 350°F / 177°C | 13 to 15 minutes | Balanced crisp-to-chewy profile |
| Tall and soft-baked | 325°F / 163°C | 16 to 18 minutes | Less spreading, taller crumb, soft center |
At those baking temperatures, the cookie’s surface moves through two crucial browning reactions: the Maillard reaction — the amino-acid-and-sugar browning that produces toasted, nutty flavor — and caramelization, when sugar itself begins to break down and darken. Caramelization proceeds rapidly near roughly 320°F (160°C)[2], which is why the moment edges turn amber brown you should start paying close attention: the window between perfectly browned and slightly scorched is often only about one minute wide.
Why Your Cookies Miss the Mark — and How to Fix It
Few baking projects produce as many emotional swings as chocolate chip cookies. The good news is that nearly every common failure has one specific cause — fix the cause, and your next batch will behave.
Additionally, do not fall for the temptation to taste raw dough during assembly. The USDA FSIS warns that raw flour may carry pathogens like E. coli and that raw eggs may contain Salmonella — which is why unbaked cookie dough should never be eaten as a snack, regardless of how delicious it smells[1]. If you want to taste-test the dough safely, make a small eggless version with heat-treated flour, or simply wait for the baked cookies to cool slightly.
A final note on oven accuracy: many home ovens run 15 to 25°F cooler or hotter than their dial claims. An inexpensive oven thermometer costs very little and removes one of the biggest variables from cookie baking. If your first tray browns too quickly, lower the dial by 10°F rather than changing the entire recipe.
Pairing and Storage: Keeping the First-Bite Magic Alive
A chocolate chip cookie leaves the oven at its peak — edges crisp, center molten, and the chocolate in a glossy, just-set state. That peak does not last forever, but proper storage extends it better than most people realize.
For drinking, the classic pairing of cold milk is not merely nostalgic: the milk’s fat coats the tongue, mutes the sugar’s sharpness, and lets the chocolate flavor linger. A small glass of whole milk works better than skim. For an adult counterpart, a medium-bodied coffee or a glass of porter-style beer echoes the cookie’s caramel notes. Avoid pairing with anything too sweet, which diminishes the cookie’s butterscotch complexity.
Baked cookies stay at their best for two to three days in an airtight container at room temperature. To restore just-baked texture, reheat a single cookie on a parchment-lined sheet at 350°F (177°C) for three to four minutes — the edges will re-crisp while the center softens. Unbaked dough is far more freezer-friendly than baked cookies, and freezing preserves the option of hot cookies on demand.
Scoop the chilled dough into 80 g balls, arrange them on a parchment-lined tray without touching, and freeze for 2 hours until solid. Transfer the balls to a zip-top freezer bag and store for up to 3 months. To bake, place the frozen balls directly onto parchment, add 1 to 2 minutes to your normal bake time, and do not thaw first — baking from frozen actually yields slightly taller centers because the butter melts more slowly.
Chocolate Chip Cookie FAQ
Can I use chocolate chips instead of chopped chocolate bars?
Yes. Standard chips contain stabilizers that help them hold their shape, so the texture will be slightly less molten but still excellent. For a compromise, replace half the chips with chopped chocolate — the chopped bits will pool, while the chips retain neat pockets of texture. If you use white, milk, or caramelized white chocolate, reduce the recipe’s sugar slightly because those chocolates are significantly sweeter.
Does the dough really need to chill overnight?
For this particular formula, yes — it matters more than any other single step. A 12-hour rest hydrates the flour, firms the butter, darkens the sugar’s flavor, and allows the vanilla to penetrate the entire dough. Cookies baked immediately after mixing will spread wider, rise less, and taste flatter. If you are in a hurry, the absolute minimum chill time is 2 hours, though the texture will fall short of the overnight version.
Why are my cookies always flat, even after chilling?
Flatness usually means the dough has too little flour, too much fat, over-creamed butter, or a baking soda that has lost strength. Check your baking soda’s freshness by dropping a little into vinegar — if it does not bubble vigorously, replace it. Also measure flour by weight: dipping your cup into the flour bag can leave you short by 20 to 30 percent, which is often enough to cause total cookie collapse.
Can I make this recipe dairy-free?
You can swap the butter for a plant-based baking stick with at least 75% fat content, but avoid soft tub margarines, which contain too much water and produce thin, greasy cookies. Coconut oil works in a pinch but creates a distinct coconut flavor and a slightly different melt in the mouth. Omit the finishing flaky salt if it contains butter flavoring, and verify your chocolate is dairy-free — many dark chocolate brands are.
What is the best chocolate percentage for chocolate chip cookies?
Most tasters prefer 60 to 66 percent cacao in the classic recipe because it offers enough bitterness to balance 350 g of sugar without tasting aggressively dark. At 70 percent and above, reduce the dough’s granulated sugar by about 20 g to keep the cookie balanced, and expect a more complex, slightly fruitier chocolate sensation. If you use milk chocolate at 38 to 45 percent, increase the salt slightly and consider using a darker roast-style chocolate for depth.
Why does my recipe call for an extra egg yolk?
The extra yolk adds a small amount of fat and lecithin without adding much water or albumen. Whole egg whites contain large amounts of water and protein, both of which promote structure — and too much of both makes a cookie cakey. The added yolk shifts the balance toward a silkier, more tender, almost custard-like center while keeping the edges crisp.
- Weigh your ingredients: the master formula uses 300 g flour, 226 g butter, 350 g total sugar, and 285 g chopped chocolate, producing a consistent chewy edge with a fudgy center.
- Chill the mixed dough for at least 12 hours — ideally 24 to 72 — so the flour hydrates, the sugar dissolves further, and the cookies spread slowly rather than collapsing.
- Bake 80 g dough balls at 350°F (177°C) for 13 to 15 minutes and pull them while the centers still look slightly soft; carryover heat finishes the interior during the 5-minute pan rest.
- Use both brown sugar and granulated sugar: brown sugar brings molasses moisture and acidity, while white sugar drives crispness and caramelization at the cookie’s surface.
- Choose a 60 to 70% dark chocolate bar over standard chips for molten pools of chocolate, or combine chips and chopped bar for a hybrid texture.
- Never consume unbaked dough: the USDA FSIS identifies raw flour and raw eggs as potential sources of foodborne illness[1].
- USDA Food Safety and Inspection Service (FSIS), public guidance on the risks of eating raw flour and raw eggs in unbaked dough and batter — raw dough and batter can contain germs that make you sick. https://www.fsis.usda.gov
- Harold McGee, On Food and Cooking: The Science and Lore of the Kitchen, revised edition (Scribner, 2004) — sugar caramelization and Maillard browning behavior at high temperatures.